Your craft space may be a dining table that needs clearing before dinner, a bedroom desk, or one corner of a shared home office. Getting supplies out is manageable. Finding somewhere for a half-built model, an embroidery project, or a wet painting when the session ends is harder.
The most useful craft storage ideas for small spaces do more than hide supplies. They help you find what you need, pause without damaging your work, and restart without spending the first twenty minutes remembering where you stopped.
Think of your space as a place a project moves through: start, make, pause, store, resume, and finish. You do not need a dedicated craft room to support that sequence. You need a clear work surface, a few defined storage spots, and a way to keep your progress with the project.
For a small craft space, start with four zones: everyday tools, backup supplies, active projects, and finished work. Give every unfinished project its own temporary parking spot.
Connect three things between sessions: a project parking spot that supports the work, a resume note that records progress, and a restart check before continuing.
Start With the Project, Not the Storage Container
Before choosing containers, gather what you actually use and separate it into four groups:
- Everyday tools: Scissors, rulers, tweezers, pencils, and other tools you reach for repeatedly.
- Project supplies: Yarn, thread, paint, clay, model sheets, and materials waiting to be used.
- Work in progress: The partly made object, plus the materials and information needed to continue it.
- Finished pieces: Work ready to display, use, give away, or store.
This distinction matters because each group needs a different kind of access. Scissors should be easy to return after every session. Spare yarn can sit farther away. A partly assembled mechanism needs physical support, not just an empty drawer.
Measure the shelf or cabinet opening where a project will rest, including its height. A box that holds the unopened kit may not fit the growing build.
Create Four Storage Zones in a Small Craft Space
A zone does not have to mean a piece of furniture. Four defined places within one cabinet can be enough.
Zone 1: The Reach Zone
Keep your current tools in a small caddy, shallow drawer, or tray beside the work area. If you need something repeatedly during a session, do not bury it. Return shared tools here rather than buying a separate set for every project.
Zone 2: The Supply Zone
Store backup materials by craft or use, with frequently used supplies easiest to retrieve. Clear containers help when seeing the contents is useful. Opaque boxes work for visually busy materials, provided their labels are specific: "Embroidery thread" is more helpful than "Craft stuff."
Visible does not mean everything must be exposed.
Zone 3: The Project Zone
Reserve one shelf, drawer, or protected surface for active work. Each project within that zone should have its own parking spot.
Zone 4: The Finished-Work Zone
Decide what happens after completion. Leave a display space, a place for a useful handmade object, or a box for an upcoming gift. If finished pieces keep returning to the worktable, the storage system is missing its final step.
Give Every Unfinished Project Its Own Parking Spot
An unfinished craft project should have its own temporary storage spot where the work, loose parts, instructions, and a next-step note stay together until the next session.
Use One Container Per Active Project
A project pouch can hold embroidery fabric, thread, and a pattern. A basket can hold a small knitting project. A rigid tray or box can support a model and its parts containers.
Keep project-specific materials together, but return shared scissors and rulers to the reach zone. For supplies too large to fit, add a location note: "Remaining yarn: lower cabinet, blue box."
Set a practical limit based on the parking spaces available. If both project trays are occupied, finish something or deliberately move one project into longer-term storage before starting another. Label a longer pause with the project name, date, and restart note.
Keep the Project Flat When It Needs to Stay Flat
Choose storage for the object's current condition, not just the craft category. Support an assembled model in its normal orientation on a rigid, level base. Leave clearance around protruding parts rather than pressing a lid onto them.
Keep a wet painting on a stable surface with nothing touching the painted face. For hand embroidery, store the fabric, hoop, and pattern together, but remove the work from the hoop for an extended break. DMC's hoop guidance warns that prolonged hoop tension can leave difficult creases.
Store Small Parts Without Losing the Next Step
Beads, screws, wooden components, needles, and tiny decorations need more than a communal jar. Their identity and place in the project matter.
For an active project, organizing by stage can be more useful than organizing by material.
Keep unused materials, prepared parts, and assembled sections separate. For a model kit, leave pieces in their labeled sheets until the instructions call for them. If you have already removed a part, retain its identification rather than relying on its shape.
Label small containers by stage:
- Next: Parts identified for the next instruction.
- Later: Identified pieces needed farther into the project.
- Spare: Parts the instructions confirm are extras.
- Completed: Finished subassemblies awaiting installation.
Use lidded compartments or labeled packets that actually contain the smallest pieces. Loose needles belong in a needle case, not an open tray. Keep sharp tools and small parts inaccessible to children and pets.
Do not classify an unfamiliar leftover as waste simply because its purpose is not obvious yet.
Community tip: Joe-K keeps the numbered board area with removed parts and reuses zip-seal bags for painted pieces. See his small-parts identification method on Robotime Community.
Leave Yourself a "Resume Note"
The goal of storage is not just to protect the project. It should protect your momentum.
Before putting work away, record the last completed action and the first thing to do next. A simple model-building note might read:
PROJECT RESUME NOTE
- Stopped
- Step 48 completed.
- Next
- Read Step 49 and gather its listed parts.
- Check
- Revisit the movement check before adding the next assembly.
- Loose parts
- Labeled packets in the tray's right-hand compartment.
This is an example format, not instructions for a particular kit.
For knitting, record the completed row and pattern repeat. For embroidery, note the thread color and area to work next. Keep the note with the project or bookmark the relevant instruction page. A progress photo can help, but should supplement the written next step, not replace the pattern or manual.
Use Vertical Space Before Giving Up Your Work Surface
Wall shelves, pegboards, hooks, and over-door organizers can move supplies away from the making area. Choose them around what they need to hold.
Use hooks for lightweight pouches and tools. Give flat project trays a shelf they can slide onto without tilting. Store frequently used items within comfortable reach, with heavier containers lower down.
Follow the mounting and load guidance for shelves, hooks, and furniture. A fragile assembly should not sit on an over-door organizer that swings whenever someone enters.
The aim is not to fill every wall. It is to leave the tabletop available for making and keep a clear route between the table and each project's parking spot.
Make a Small Craft Station That Can Open and Close
Choose the smallest setup that supports your current habits, using containers you already own before adding furniture.
One-Box Setup
For one compact craft, keep project materials in a box and shared tools in a removable pouch. The lid should close without compressing the work. Store the box near the table where you use it.
Rolling-Cart Setup
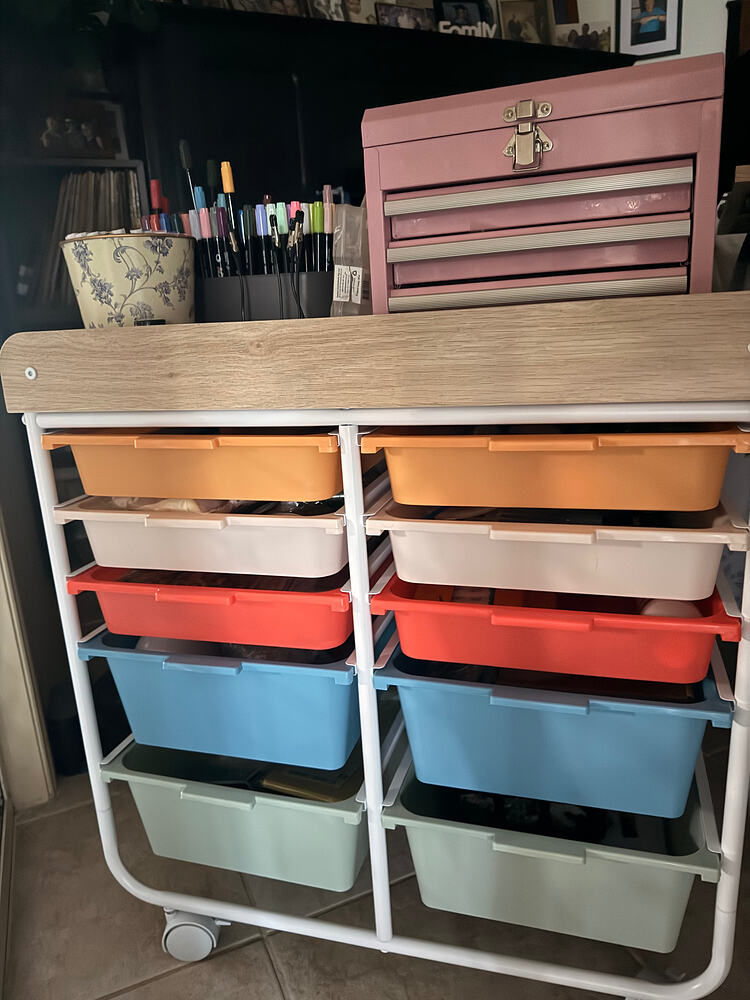
For several small crafts, assign tools, supplies, and project containers to separate shelves. Check tray fit and stability before loading it. Fragile or wet work may need a fixed parking spot rather than traveling on the cart.
Community example: Suzanne_Jones, a Robotime Community Brand Ambassador, carries her tray away overnight instead of packing everything individually. Her tray did not fit on the trolley once markers and a toolbox filled the top. See her storage setup.
Cabinet or Closet Setup
Use a shelf for active projects, labeled containers for backup supplies, and a drawer or caddy for tools. Reserve enough clearance to lift projects out without moving everything else.
As a practical target, aim to open or close the station within ten minutes. This is a setup goal, not a reason to rush cleaning tools, securing parts, or handling wet work.
How to Store Different Types of Unfinished Craft Projects
Match temporary storage to what is vulnerable at the moment you stop.
| Project | Temporary storage | Main thing to protect |
|---|---|---|
| Mechanical model | Rigid, level project tray or box with adequate height | Loose parts, supported assemblies, and alignment |
| Hand embroidery | Clean project pouch or basket; remove the hoop for extended storage | Fabric, stitches, thread identification, and pattern |
| Crochet or knitting | Project bag with secured stitches and the pattern | Working loop or live stitches, yarn, and row count |
| Painting | Stable drying board or shelf with clearance above | Painted surface, cleanliness, and drying conditions |
| Clay | Supported workboard; covering or drying arrangement suited to the material and stage | Shape and intended moisture level |
| Floral craft | Divided box for components; roomy tray for assembled flowers | Petals, stems, and small decorations |
For knitting, use correctly sized needle point protectors to help keep stitches from slipping off during storage. Clover's knitting-notions guide explains their purpose. For crochet, secure the working loop before placing the project in its bag.
Clay needs a separate decision: are you keeping material workable or letting the piece dry? For unused Crayola Air-Dry Clay, the manufacturer specifies airtight storage and advises against storing clay with added water. Do not apply one covering method to every clay type or drying stage; follow the material's instructions.
A Better Setup for Multi-Day Model Building
A detailed wooden model can occupy several sessions, so plan its resting place before opening the parts sheets. ROKR mechanical model kits are a useful example: the storage space must accommodate both loose components and a structure that becomes taller and more delicate as it grows.
Before Building
Prepare a rigid, flat tray, small labeled containers, and a place for the instructions. Allow room for the assembly's expected footprint and height, not only the original packaging. Keep suspected offcuts separate from confirmed spare parts until you have identified them.
If you are deciding on a first build, the guide to choosing your first mechanical wooden model kit can help you match the project to your available sessions and experience.
During the Build
Keep the current instruction, its parts, and completed subassemblies distinct. Bring out only what the next stage requires. Avoid laying loose sheets or tools across finished sections, where they can catch on a protruding shaft or decorative piece.
When Stopping
Finish a clear instruction step where practical. Perform only the movement checks directed for that stage, secure loose components, and write the next-step note. Do not force an incomplete mechanism to run as if the whole model were finished.
Move the tray by its base, keeping it level. If the growing model is too large or unstable to move safely, leave it on a protected fixed surface instead.
When Restarting
Read your note and the previous instruction before reaching for new parts. Check that nothing shifted in storage and repeat any relevant alignment or movement check specified by the manual. Continue once the current assembly matches the expected stage.
Do a Quick Reset After Every Craft Session
Aim for a short, repeatable reset that leaves the work secure and the next step clear. Work through the same order each time:
- Trash: Remove confirmed scraps and rubbish, keeping uncertain kit pieces.
- Tools: Clean as needed and return tools to the reach zone.
- Supplies: Close containers and return backup materials to their labeled places.
- Project: Secure the work and move it to its parking spot, or leave it in its designated drying area.
- Note: Record your stopping point and next action before walking away.
If putting everything away routinely feels difficult, notice which step creates the delay. A hard-to-reach shelf or several unrelated boxes may be the problem, rather than the amount of crafting you do.
Quick Small-Space Craft Storage Checklist
- A clear surface for making.
- Frequently used tools within easy reach.
- Labeled storage for backup supplies.
- One suitable parking spot per active project.
- Secure containers for small or sharp parts.
- A resume note with every paused project.
- Vertical storage that leaves projects easy to retrieve.
- A destination for finished work.
Start with the project currently occupying your table. Give it a safe resting place and a clear next step. Expand the system only where you encounter a real problem. Useful craft organization makes both the room and the unfinished work easier to return to.
Finished your model? See our guide to storing and protecting completed 3D wooden puzzles.
Frequently Asked Questions
How do you store unfinished craft projects?
Keep each active project with its instructions, project-specific materials, and a next-step note. Choose a pouch, tray, box, or protected surface that supports its current condition. Wet, delicate, or partly assembled work needs more consideration than unused supplies. Before continuing, read the note and check that the work is still supported and nothing has shifted.
How can I organize craft supplies in a small space?
Separate everyday tools, backup supplies, active projects, and finished work. Keep frequent-use items accessible and label anything stored out of sight. Use shelves or hooks where appropriate, but reserve a place for unfinished work before filling every available storage space.
What is the best way to store small craft parts?
Use labeled, securely closing compartments or packets that cannot let the smallest pieces migrate between sections. Keep part numbers or color codes attached to their materials. For active projects, separate what comes next from later components and confirmed spares.
How do I keep my craft table from becoming cluttered?
Give everything that leaves the table a destination. Return shared tools and backup materials after each session, then park the unfinished project with its progress note. A brief reset is easier when you do not have to invent a storage place each time.
How should I store an unfinished model kit?
Support the assembly on a rigid, level base with enough clearance around fragile parts. Keep labeled sheets, loose components, and instructions together but separate from completed sections. Record the last completed step, and follow the kit's guidance before moving or testing unfinished mechanisms.