

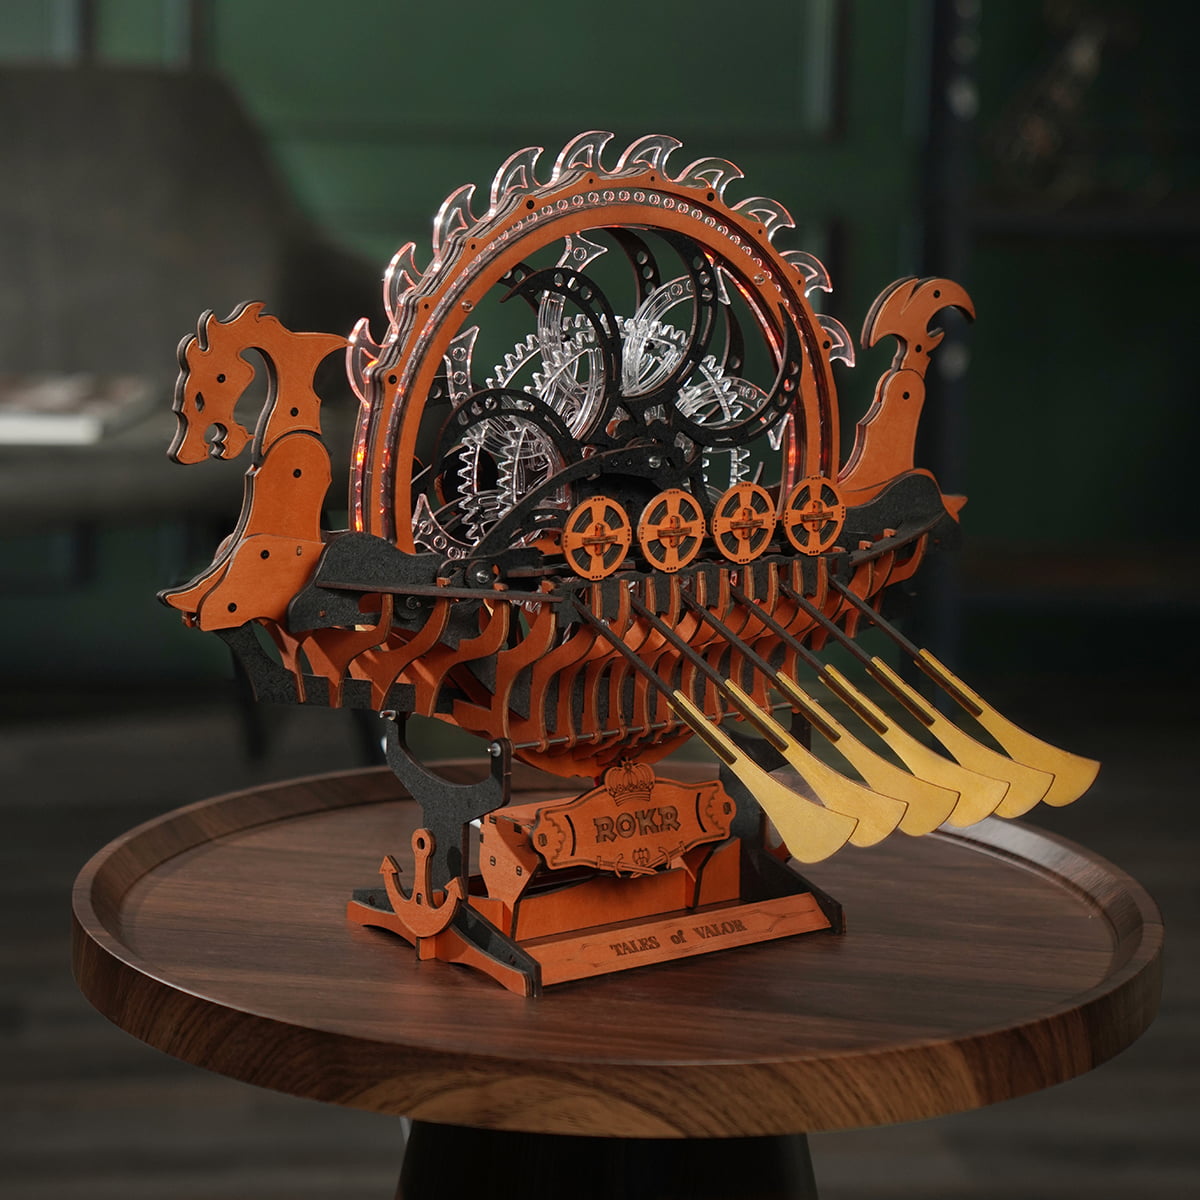
The ROKR Viking Dragon Ship LK802 looks like a display ship, but its build is really a compact mechanical journey: a lit central wheel, hidden wiring, rotating side wheels, mirrored rowing mechanisms, shields, and twelve moving oars.
Seven Robotime Community build posts by TheToday cover almost the whole process from first wheel to final powered test. Together, they make a useful companion guide for builders who want to know which stages are smooth, which parts need extra alignment, and where one real-world mistake can save everyone else time.
This version includes selected photos from the original Robotime Community build logs. Each community photo is credited under the image and links back to the post where readers can see the full photo sequence and TheToday's complete notes.
Can These Posts Form a Complete Guide?
Yes. The links cover the seven major manual stages and one important correction stage. The only missing piece is the separate unboxing post, which is not essential for assembly. For a store blog, the strongest approach is to combine them into a practical guide organized by build stage rather than retelling every diary detail.
| Stage | Main Work | Builder Watchpoint |
|---|---|---|
| 1/7 | Central wheel, lights, first layered assembly | Test lights first, secure the light strip, and hold layers tightly while screwing. |
| 2/7 | Dragon head, tail, body, wheel connection, early engine area | Keep boards flush when screws pass through multiple thin layers. |
| 3/7 | Hull sections and engine placement | Protect the unfinished hull until the support base is built. |
| 4-5/7 | Base, long metal bars, side wheels | Realign hull holes as the rods pass through; build the two side wheels mirrored. |
| X/7 and 6/7 | Rowing mechanisms, corrected and installed | Confirm the curved mechanism parts face the right direction before final assembly. |
| 7/7 | Wiring, switch, USB-C port, final oars | Wax each oar's contact area and test the motors before installing the oars. |
Before You Start
- Test the electronics first The source build begins by testing the lights and gear movement before the ship structure grows around them.
- Use the small wooden helper tool The kit includes a simple pushing tool that saves your fingers when fitting repeated small connectors.
- Wax moving contact points The wheel, gears, mechanisms, and oars all benefit from smooth contact where the manual calls for it.
- Plan display space early This model is repeatedly described as bigger than expected, especially once the base and oars are attached.
Stage 1: Build the Central Wheel and Lights
The first stage starts with the light test, then moves into the large central wheel. The wheel is layered around a glass-like part, with a light strip hidden inside so it can glow once the model is powered.

The source builder found this section mostly straightforward, but it asks for more hand strength than it first appears. The important move is to keep the layers pressed together while driving the six screws through the stack. If the light strip feels likely to wander, add only the support needed to keep it in place without interfering with the wheel structure.

See the original community post for the complete wheel-light photo sequence and TheToday's notes on tape, glue, waxing, and screw pressure.
Stage 2: Add the Dragon and Engine Core
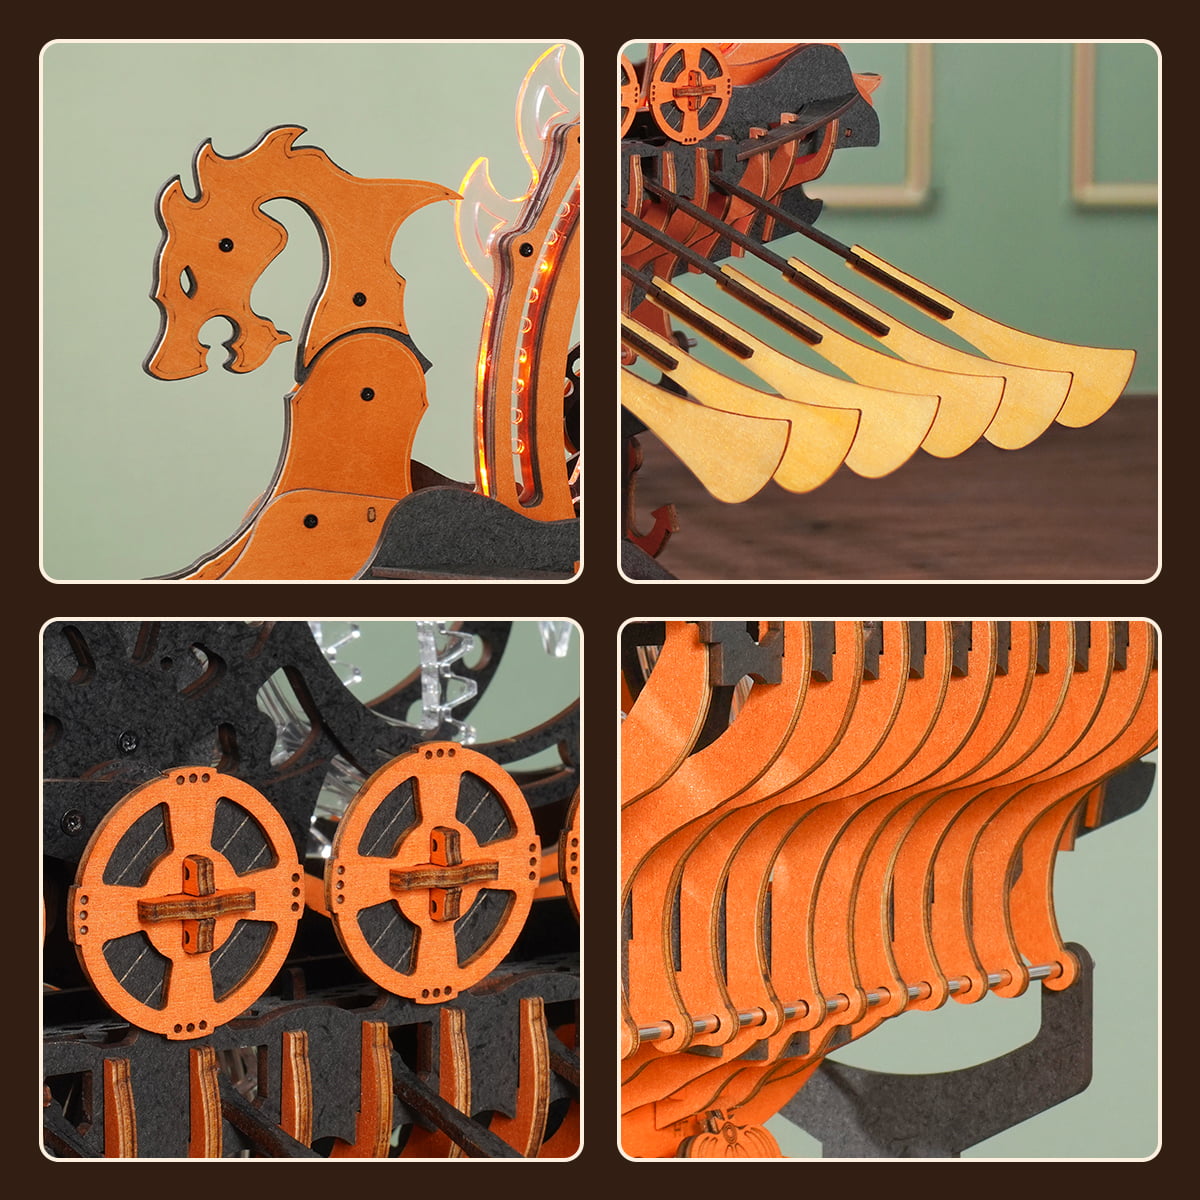
The dragon head and tail are built in a similar sequence and are reported as easy, satisfying subassemblies. The head, tail, body, and earlier wheel then come together so the ship starts to show its full length.

This is also where the build begins to feel large. The main caution is screw control: when screws pass through several thin wooden layers, press the boards flush and keep the screwdriver seated so it does not slip or push the screw off course.
Read the original Stage 2 post for the dragon-head, dragon-tail, body, and early engine-area build photos.
Stage 3: Fit the Hull Sections
The hull comes after the dragon body, which feels different from more traditional ship kits where the hull often comes first. The build uses two similar hull sections, one toward the front and one toward the back, with the engine section sitting in the center.

This stage is not especially long, but the unfinished ship needs care afterward. Before the base is installed, avoid letting one side of the hull carry the model's weight for too long. A soft temporary support is smarter than leaving delicate curved pieces under pressure.
Go to the Stage 3 community post for the full hull progression, including the front and rear hull sections.
Stage 4: Build the Base and Lock the Ship In
The support base is large for a reason: it holds the ship, hides much of the later mechanical system, and gives the finished model its display stance. Once the base is ready, the ship is not simply placed on top. Long metal bars pass through the hull holes and the base ends, then small clear retainers secure them.

This is one of the first true alignment checks. If the metal rod refuses to pass cleanly, do not force it. The source builder realized the hull parts needed realignment as the rods went through. Work slowly from hole to hole and let the rod show you which section needs a small correction.
The Stage 4-5 original post is the best place to inspect the base, rods, clear retainers, and alignment sequence in order.
Stage 5: Build the Side Wheels
The side wheels are the dark spiral pieces that later transfer motion into the rowing system. Build two of them, facing opposite directions. Their shape is visually dramatic, but the useful assembly lesson is very practical: when small round wooden pieces keep falling away while you screw through the clear circle, hold the clear circle vertically.

That small change turns a frustrating balancing act into a cleaner build step. It also helps protect your mood, which matters more than builders admit when a mechanical kit asks for patience.
Use the original Stage 4-5 post if you want to compare the two mirrored side wheels before installing them.
Stage 6: Build the Rowing Mechanisms Carefully
This is the most important correction from the whole community series. The source builder first assembled the rowing mechanism incorrectly, then renamed that post as an X/7 update because the mechanism had to be taken apart and rebuilt. The mistake involved the orientation of the longer curved parts and the screw setup.

The good news is that the kit offers a clever alignment aid: holes in one of the parts sheets help guide the mechanism assembly. Keep that sheet until you are sure both mirrored mechanisms are correct. Before installing them into the hull, compare both sides, check the direction of the curved elements, and move the linkage gently by hand.

Stage 7: Install the Mechanisms, Wheels, and Shields
Once the mechanisms are rebuilt correctly, they fit into the hull. They are movable, so expect to slide or nudge them slightly forward or backward until they line up with the black parts and the side wheel gear.

After that, the side wheels are secured with small circular parts, and the shields are added along both sides. The shields complete the Viking look, but they also make later access tighter, so it is worth checking the mechanism movement before the sides become visually finished.
Open the 6/7 community post for the corrected installation sequence, including the side wheels, shields, and moving mechanism checks.
Stage 8: Wire the Base and Add the Oars
The final stage places the motor, wiring, plug, USB-C port, and on/off switch inside the base. The source builder appreciated the switch because it lets the finished ship stay connected without leaving the lights on continuously.

The oars are the last major parts. There are twelve total, six on each side, and each one is built from four parts. Wax the areas that contact the moving structure, then pass each oar through the shield opening and into the smaller mechanism hole. Once installed, the ship can be powered on so the wheels glow and rotate while the oars row.

One clever storage detail: the oars can be removed and stored along both sides of the base, which helps when moving the model or reducing its footprint.
The final community post shows the wiring route, switch setup, oar installation, removable-oar storage, and the finished moving ship.
Quick Troubleshooting Checklist
- Wheel layers feel hard to close Recheck layer order, keep everything compressed, and drive screws slowly.
- Metal rods will not pass through the hull Stop and realign the hull sections instead of forcing the rod.
- Side wheel screws feel fiddly Hold the clear wheel piece vertically so the small round pieces stay easier to control.
- Mechanism movement looks wrong Compare both mirrored mechanisms before installation and check the curved part orientation.
- Oars drag or hesitate Wax the contact areas and confirm each oar passes through both the shield opening and mechanism hole cleanly.
FAQ
Is the Viking Dragon Ship hard to build?
The source build describes the early structure as easier than expected, but the mechanisms, rods, side wheels, and oars require patience. Treat it as a medium mechanical model with a few alignment-heavy moments.
Does the Viking Dragon Ship have sound?
No sound was confirmed in the source posts or official product context. The confirmed features are lights, rotating wheels, and rowing oars when powered.
What should I do if a mechanism is wrong?
Pause before adding more surrounding parts. If the mechanism is already assembled backwards, disassemble carefully, rebuild using the parts-sheet alignment holes, and test the motion before installing it again.
Where can I get help with broken parts?
If a piece breaks or a mechanism part becomes unusable, use the ROKR part replacement support page rather than forcing a damaged moving system.
Final Thoughts
These seven community posts absolutely can become a complete assembly guide. Their value is not only that they show the order of the build, but that they capture the little realities a manual cannot always emphasize: how much pressure the screws need, when a rod reveals misalignment, why mirrored mechanisms deserve a second look, and how much easier the oars are when waxed before installation.
For builders who enjoy moving mechanical models and display-ready wooden model kits, the Viking Dragon Ship offers a memorable finish: a lit wheel, rotating side mechanisms, and a long Viking profile that earns its space on the shelf.


