

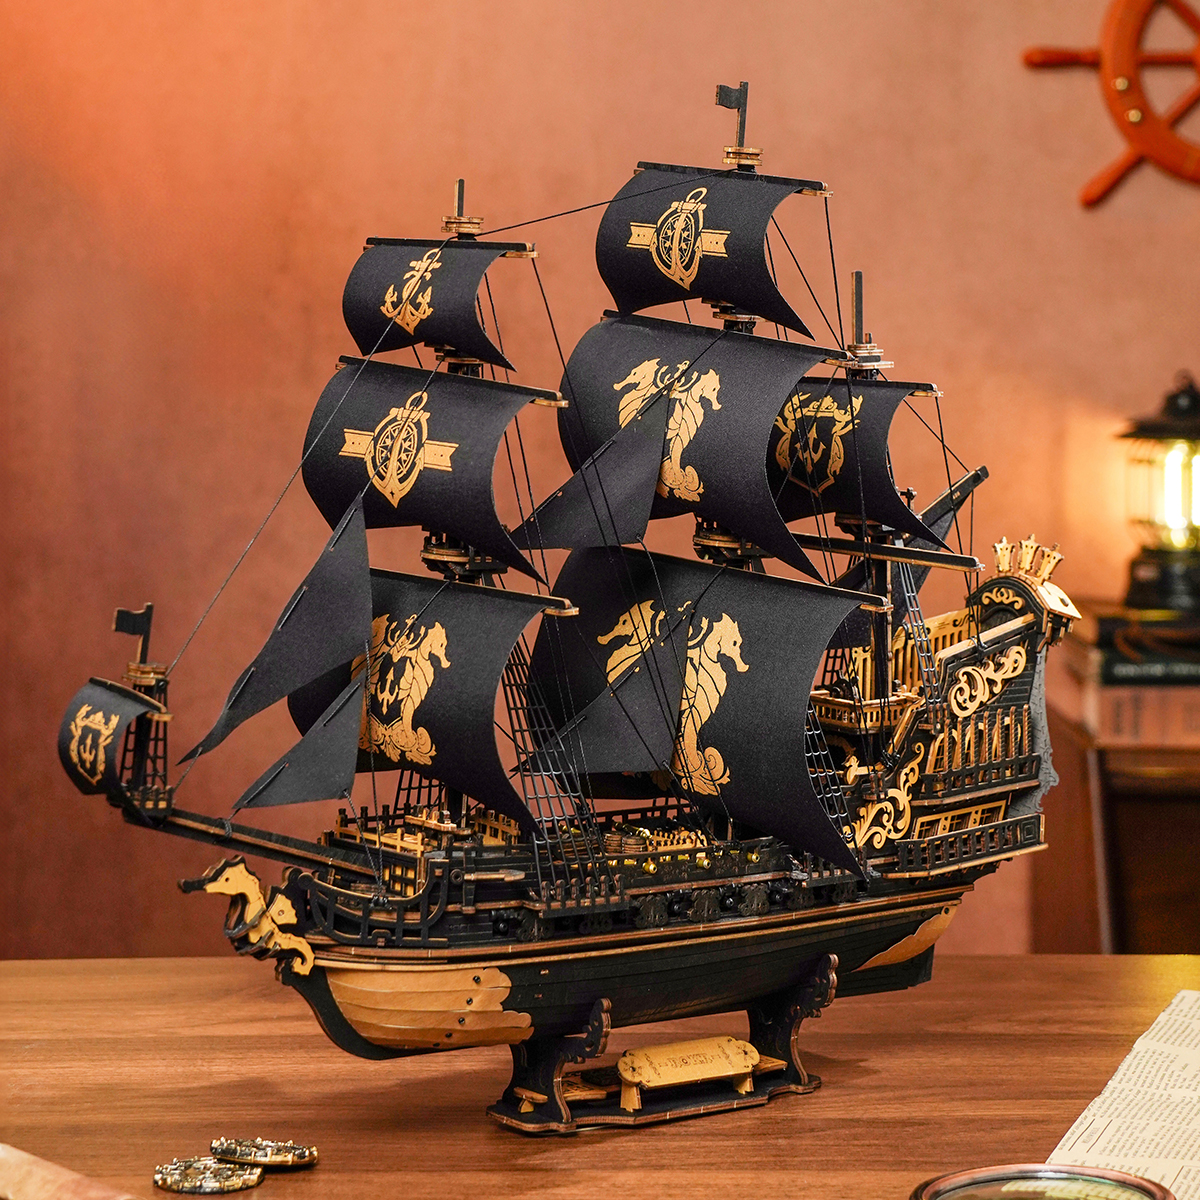
The ROKR Seahorse Barque is one of those models that feels grand before you even finish the first section. With its black sails, ornate stern, hidden cannon action, and tall rigging, it delivers a dramatic display and a demanding build at the same time.
This guide reorganizes a detailed Robotime Community post by builder TheToday into a cleaner stage-by-stage reference for ROKR readers. The original thread is practical, funny, and full of real build scars, so the goal here is not to replace that builder voice. It is to make the most useful lessons easier to scan before or during assembly.
Why This Kit Needs Extra Care
The Seahorse Barque is not difficult because every step is mysterious. It is difficult because small misalignments can create bigger problems later. A loose decorative part becomes a broken fold. A slightly shifted stern window throws off a later cross-piece. A rope-tied detail added too early becomes awkward once the masts and sails go up.
That is why the smartest way to approach this ship is as one of ROKR's more demanding mechanical models: slow down, dry-fit anything delicate, and think one step ahead whenever motion, alignment, or threaded rigging is involved.
| Build Area | What Usually Goes Wrong | Best Habit |
|---|---|---|
| Hull structure | Parts sit slightly off, then screw holes fight back. | Pre-assemble connected pieces and align before pressure. |
| Paper trim and gunports | Edges lift, holes drift, and moving flaps drag. | Secure tips carefully and reduce friction early. |
| Decorative mini parts | Thin folds, bells, stairs, and anchors loosen or crack. | Use light glue only where the build repeatedly proves it helps. |
| Stern, masts, and rigging | Late-stage alignment gets crowded and harder to correct. | Check rope timing and fit from the back of the ship forward. |
Prep That Pays Off Before You Start
- Dry-fit fragile joins Thin folded elements and decorative frames can look stronger than they really are.
- Check moving clearances early Gunports, stair sections, and mast pass-throughs all benefit from a quick motion test before final pressure.
- Keep glue selective This is not a glue-everything build, but several small parts clearly behave better with reinforcement.
- Respect alignment over speed The more decorative the section looks, the more likely it is tied to a later fit somewhere else.
The 12 Community-Tested Tips
Base and Hull Setup
- Pre-assemble the C11 and C14 logo section before forcing it onto the base. The original builder found this joint surprisingly tricky. Get the small set aligned first, then guide it into place gently instead of bending the connection while attaching it.
- Be exact when driving the hull screws. On the hull side strips, the screws need to find the marked holes cleanly. If a screw starts biting wood instead of dropping into the opening, back out and reset before damage builds.
- Align the paper bow and stern trim with the holes before fixing it down. Whether you use the included adhesive method or another careful attachment approach, the pointed ends and the screw-hole alignment matter more than they seem in the moment.
Moving Parts and Fragile Fits
- Reduce friction on every gunport holder. Some community builders found that the cannon-reveal flaps could stick open or refuse to open smoothly. A light wax treatment on the rotating contact area helps keep the motion more consistent.
- Handle the foldable E63 parts like glass. These thin folded pieces can split while another part is pressed over them. Treat them as a known weak point and avoid any rushed top-down pressure.
- Glue the tiny bell before the upper assembly goes on. The hanging bell part can fall loose repeatedly if left unsecured. This is one of those small preventive moves that saves a lot of annoyance later.
- Glue the stair runs that want to float. The stair steps can move slightly up and down or even loosen from the side structure. A small amount of glue makes the finished ship feel more solid and less fussy to handle.
Stern Window and Ship Structure
- Secure D4 and D10 before folding C31 around the back window structure. The stern window assembly asks you to hold several things steady while wrapping a fragile outer part. Fixing the inner structure first lowers the chance of cracking that outer shell.
- Take extra time when aligning the rear window build to the ship. This is one of the most important chain-reaction steps in the whole model. If the rear structure sits even a little off, a later cross-piece will resist fitting correctly on both sides.
- Do not be shy about reinforcing the bow barriers, seahorse figurehead, and anchors. These decorative parts look finished once installed, but they can loosen too easily if left to friction alone.
Rigging Timing and Mast Fitting
- Pause before following the page 31 placement exactly. The community post points out that one small decorative assembly appears to be installed too early in the manual. If you place it immediately, you may have to remove it later so the rope can be tied correctly first.
- Fit the masts with patience, and consider working from back to front. The post suggests that once a mast reaches its holder, you should move it slightly until it lines up with the X-shaped opening below. The manual may imply a front-to-back order, but the community experience here says sternward first can be easier.
What These Tips Add Up To
None of these warnings are meant to scare builders away from the Seahorse Barque. In fact, they show why the model is memorable. It is dramatic, mechanical, decorative, and just temperamental enough to make the finished ship feel earned.
That is also why this kit works so well for hobbyists who already enjoy more involved wooden model kits. The reward is not just the final silhouette. It is the feeling that you learned the ship while building it.
FAQ
Is the Seahorse Barque good for beginners?
It can be a first build, and the original community author says it was theirs, but it is a bold first choice. Builders who are patient and comfortable checking alignment twice will enjoy it more than builders looking for a quick weekend project.
Where should I use glue on this kit?
The strongest community recommendations are the loose bell, the moving stair sections, the stern window support pieces, and a few decorative parts like the figurehead, barriers, and anchors. Use restraint elsewhere so you do not lock moving features by accident.
What if a part breaks?
Do not force the next step immediately. Reassess the alignment first, repair only what you understand clearly, and use the ROKR part replacement page when a break affects the structure or motion of the model.
Final Thoughts
The Seahorse Barque already has the drama: black sails, golden cannons, a proud figurehead, and a ship profile that looks like it sailed out of a story. What this community guide adds is confidence. You know where the fragile folds are, which late-stage alignments deserve extra patience, and which small glue decisions can save you a bigger headache.
If you are preparing to build one, this is the kind of article worth opening beside the manual. And if you already finished yours, you probably understand exactly why these 12 tips exist.


